Crafting a custom FPV drone often presents a formidable challenge, especially when aiming for a miniature form factor paired with the flexibility of an open-source microcontroller like Arduino. Hobbyists frequently encounter hurdles ranging from sourcing appropriate micro-components to intricate wiring, complex firmware configurations, and the inevitable troubleshooting that comes with custom electronics. The pursuit of a high-performance, yet affordable, micro-drone capable of thrilling first-person view flights can feel like an exclusive club, often requiring significant investment or a deep dive into complex engineering principles. However, as the video above brilliantly demonstrates, the solution lies in embracing the DIY spirit, leveraging accessible Arduino-compatible modules, and meticulously piecing together a tiny marvel that not only flies but also provides an unparalleled learning experience.
This comprehensive guide expands on the video’s insights, offering a deeper dive into the technical intricacies, design philosophy, and troubleshooting strategies involved in building your very own Arduino FPV drone. We’ll explore the critical decisions behind component selection, delve into the meticulous craft of frame construction, and dissect the process of integrating complex electronics. More importantly, we’ll analyze the common pitfalls and innovative solutions that transform a collection of parts into a stable, responsive, and exhilarating micro-quadcopter. Prepare to elevate your understanding of drone engineering and embark on a rewarding journey of creation.
The Allure of the Micro Arduino FPV Drone
The appeal of a miniature FPV drone is undeniable, offering the thrill of high-speed, first-person flight in spaces too restrictive for larger quadcopters. Building such a device from the ground up, particularly with an Arduino as its brain, transforms the experience from mere piloting into a profound journey of electronic and mechanical engineering. These tiny machines open up possibilities for indoor racing, agile maneuvers in tight spaces, and a more intimate connection with the technology you create. Furthermore, the inherent DIY nature of an Arduino-based drone significantly reduces entry barriers, both in terms of cost and the depth of technical understanding required, making advanced drone technology accessible to a broader audience of makers and enthusiasts.
Opting for an Arduino platform for your micro FPV drone offers unparalleled flexibility and a steep learning curve. Unlike off-the-shelf drones, an Arduino core grants complete control over the flight controller’s firmware, allowing for bespoke adjustments and experimentation. This level of customization fosters a deeper understanding of flight dynamics, sensor integration, and control algorithms. The compact size of these drones, often weighing in at a mere 30 grams as showcased in the video, demands precision engineering and an acute awareness of every component’s contribution to the overall performance, pushing builders to optimize for weight, power efficiency, and structural integrity. This combination of learning, customization, and accessible high-tech fun defines the essence of the micro Arduino FPV drone.
Critical Components for Your Custom Arduino FPV Drone Build
The success of a micro FPV drone hinges on the careful selection and integration of its core components, each playing a vital role in its flight performance and functionality. For an DIY FPV drone, especially one designed for a low budget and small form factor, every gram and milliampere counts. The video highlights a precise bill of materials, crucial for achieving both the intended flight characteristics and the learning objectives of the project. Understanding the ‘why’ behind each component choice is as important as the component itself, guiding future customization and troubleshooting efforts.
Brushed Coreless Motors & Propellers: The Power-to-Weight Imperative
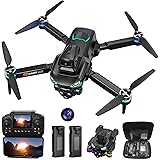
For micro drones, brushed coreless motors are the go-to choice due to their exceptional power-to-weight ratio and compact size. The video’s experience with initial motors yielding only 6 grams of thrust each, compared to the optimal 14 grams, underscores a critical design principle: the drone’s total thrust must significantly exceed its total weight to achieve lift and agile flight. With a target weight of 30 grams, having four motors collectively producing up to 60 grams of thrust provides a healthy 2:1 thrust-to-weight ratio, ensuring sufficient power for aggressive maneuvers and rapid ascent. Propeller selection, specifically their diameter (no more than 31mm for this build) and blade orientation, is equally vital, directly impacting thrust generation and flight efficiency. These components are the workhorses, and their specifications dictate the drone’s fundamental capabilities.
Custom Motor Driver Board: Precision Power Delivery
A custom motor driver board, often built around MOSFETs (Metal-Oxide-Semiconductor Field-Effect Transistors) and Schottky flyback diodes, is essential for translating the Arduino’s digital PWM signals into regulated power for the motors. MOSFETs act as high-speed electronic switches, efficiently controlling motor speed, while flyback diodes protect the sensitive control circuitry from voltage spikes generated by the inductive motors when they rapidly change speed or direction. The video’s emphasis on surface-mount device (SMD) components and careful soldering, along with electrostatic discharge (ESD) precautions, highlights the precision required for such miniature electronics. Building this board from scratch provides invaluable insight into power electronics and circuit design, crucial for anyone delving into custom robotics. The board’s minimalist design, weighing less than a gram, is a testament to efficient engineering for micro-sized applications.
Arduino Pro Mini & MPU6050: The Flight Controller Core
The heart of this Arduino drone is the Arduino Pro Mini, specifically the 3.3-volt version, chosen for its small footprint and compatibility with a single LiPo cell. It processes sensor data and executes flight control algorithms. Paired with the MPU6050, a 6-axis motion tracking sensor (gyroscope and accelerometer), the Arduino receives crucial orientation and acceleration data, enabling it to maintain stability and respond to pilot inputs. The MPU6050 provides real-time feedback on the drone’s pitch, roll, and yaw, which the Arduino then uses to adjust motor speeds. Powering the MPU6050 directly from the LiPo battery ensures a consistent power supply, vital for stable sensor readings and overall flight performance, while integrating it with minimal pin headers reduces weight and complexity.
NRF24L01 Radio Transceiver: Wireless Communication
The NRF24L01 radio transceiver module facilitates wireless communication between the custom Arduino-based transmitter and the drone. This compact and low-power module is ideal for short-range control applications, enabling real-time command transmission for throttle, pitch, roll, and yaw. Optimizing its integration by removing pin headers and using direct wiring minimizes weight and potential interference. Connecting it to the gyro module’s 3.3-volt regulator, which often includes filtering capacitors, helps to provide a cleaner power supply, mitigating the risk of data corruption or instability caused by electrical noise—a common issue in miniature electronic systems.
FPV Camera and LiPo Cell: Vision and Endurance
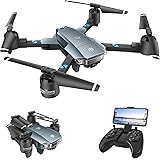
A 3-gram, 600 TVL (Television Line) FPV camera with a built-in 5.8-gigahertz transmitter delivers the immersive first-person view experience. Its incredibly small size is critical for the drone’s overall weight budget, allowing for dynamic aerial maneuvers. The 5.8 GHz frequency is standard for FPV, providing a clear video link to compatible goggles. Powering it directly from the LiPo battery simplifies wiring and ensures a dedicated power source. The 250 milliampere-hour (mAh) LiPo cell provides the necessary energy, balancing flight duration with minimal weight. Proper battery placement, perhaps in a rubber band “pocket” as suggested, is crucial for balancing the drone and optimizing its center of gravity, which directly impacts flight stability.
Crafting the Frame: Structural Integrity for Micro-Flight
The drone’s frame serves as the foundation for all its components, dictating its structural integrity, weight distribution, and overall flight characteristics. The video presents two distinct yet equally valid approaches to frame construction for a tiny FPV drone: the hands-on, low-cost popsicle stick method and the precision of 3D printing. Each method offers unique advantages and challenges, appealing to different aspects of the maker’s spirit.
The Art of the Popsicle Stick Frame: Lightweight and Accessible
Building the frame from popsicle sticks embodies the true spirit of DIY and offers an incredibly low-cost entry point into drone construction. The process, as demonstrated, involves printing a blueprint, meticulously cutting out pieces from thin wood, and then gluing them with PVC glue. Achieving a lightweight yet strong frame requires careful sanding down of each piece to the thickness of a credit card, except for the motor arms which require their original strength. The use of super glue to reinforce fragile areas and bicycle tube rubber for bumper guards showcases ingenious methods to enhance durability while keeping weight to a minimum. This approach not only results in a highly customized frame but also imparts invaluable skills in precision crafting and material optimization, turning humble materials into a sophisticated aerial platform.
3D Printed Frame: Precision, Repeatability, and Design Freedom
For makers with access to a 3D printer, designing and printing a frame from PLA filament offers significant advantages in precision, repeatability, and structural complexity. A 3D model allows for intricate designs that optimize for strength, weight distribution, and component mounting, often surpassing what can be achieved with hand-cut materials. While the video focuses on the wooden frame for its DIY accessibility, the option to purchase a pre-designed 3D model (like the one mentioned in the video’s description) accelerates the build process and ensures a professionally engineered structure. This method grants designers immense freedom to experiment with different geometries, integrate advanced features, and quickly iterate on designs, making it a powerful tool for rapid prototyping in drone development. Both frame options highlight the critical balance between material choice, weight reduction, and structural integrity, fundamental principles in micro-drone design.
Assembling the Brain and Muscle: Electronics Integration
With the frame constructed, the next critical phase involves meticulously integrating the electronic components that bring the custom Arduino drone to life. This process demands precision soldering, careful wiring, and an understanding of how each module interacts within the delicate ecosystem of a micro-quadcopter. The goal is to establish robust power delivery, clear communication channels, and effective flight control, all while minimizing weight and mitigating potential interference.
Motor Driver Integration and Initial Testing
The custom-built motor driver board, housing the MOSFETs and flyback diodes, is one of the first components to be installed. Gluing it securely into a crevice within the frame ensures it is protected yet accessible. The subsequent wiring of the brushed coreless motors directly to the flyback diodes, adhering to correct polarities, is crucial for their proper operation. A quick power supply test, activating each motor by pulling its corresponding transistor high, serves as an essential verification step. This ensures that the motor driver circuitry is functional and correctly connected before proceeding with the more complex flight controller integration, preventing potential headaches down the line.
Flight Controller and Radio Module Wiring: Connectivity and Clean Power
The Arduino Pro Mini, functioning as the flight controller, is mounted and connected to the MPU6050 gyro accelerometer sensor. The video highlights using a minimal two-pin header for I2C communication and additional wires for power, underscoring the drive to reduce weight. The NRF24L01 radio transceiver, critical for command input, is glued into the rear of the frame. A smart design choice is to power the NRF24L01 from the gyro module’s 3.3-volt regulator. This approach leverages the regulator’s built-in filtering capacitors, effectively reducing electrical noise without needing additional external capacitors. Shortening connections wherever possible is paramount to minimizing impedance and improving signal integrity, critical for reliable data transmission and stable flight. Furthermore, using Kapton tape and hot glue to insulate exposed pins prevents short circuits, protecting delicate components from accidental damage.
Status Indicators and Programming Access
A small 5-volt passive buzzer is installed under the front of the drone, serving as an audible indicator for status updates and mode changes, providing crucial feedback to the pilot. To program the Arduino Pro Mini, an FTDI (USB to serial converter) module is necessary. Creating a bridging connector for the FTDI allows for easy connection to the drone’s Arduino, facilitating firmware uploads and initial setup. This attention to both operational feedback and convenient programming access simplifies the development and tuning process, making the drone not just flyable but also manageable for ongoing adjustments.
The Pilot’s Interface: Building the Arduino Transmitter
A drone is only as good as its control system, and for a custom Arduino FPV drone, the transmitter is equally a DIY masterpiece. The video showcases an Arduino-based, 3D printed transmitter, an embodiment of the integrated approach to this project. This custom controller ensures seamless communication with the drone, offering precise input and real-time feedback critical for responsive flight. It’s not just a remote control; it’s a meticulously crafted extension of the pilot’s intent.
The custom transmitter’s design, inspired by community projects, incorporates essential features like toggle switches for mode selection, a charging port for its internal battery, and a voltage divider circuit for monitoring battery levels. The 3D printed enclosure provides a robust and ergonomic housing, tailored for the specific components used, including the Arduino microcontroller that translates joystick and switch inputs into digital commands. This level of customization allows for fine-tuning of control curves and assignment of functions, ensuring an intuitive and personalized flying experience. Furthermore, the ability to modify and upload custom firmware to the transmitter mirrors the flexibility offered by the drone’s flight controller, reinforcing the open-source ethos of the entire build.
Overcoming the Unseen Challenges: Deep-Dive Troubleshooting
The journey of building a micro FPV quadcopter is rarely linear, often punctuated by frustrating setbacks. The video’s transparent account of troubleshooting exemplifies the iterative nature of engineering. These challenges, far from being failures, represent invaluable learning opportunities, forcing a deeper understanding of electronics, aerodynamics, and control systems. Overcoming these unseen issues is arguably the most rewarding part of the DIY process.
Initial Flight Failure and Motor Thrust Calibration
The initial disappointment of the drone failing to lift off, followed by repeated resets, highlights the critical importance of selecting correctly specified components. The discovery that the first set of motors only produced 6 grams of thrust each—insufficient for a 30-gram drone—was a pivotal moment. Replacing them with motors capable of 14 grams of thrust each, resulting in a total thrust of up to 60 grams, immediately addressed the fundamental thrust-to-weight ratio problem. This scenario underscores that even seemingly minor component choices can have profound impacts on a drone’s basic functionality. Ensuring that motors are correctly paired (clockwise and counter-clockwise) is also vital for stable flight, a detail easily overlooked but essential for balanced torque and lift.
Addressing Arduino Resetting and Electrical Noise
The recurrence of the Arduino resetting issue, even after resolving the motor thrust, pointed to persistent electrical noise. This phenomenon, common in high-current switching circuits like motor drivers, can disrupt sensitive microcontrollers. Initial attempts with filtering capacitors at the Arduino and radio module inputs, while preventing some resets, didn’t fully resolve the problem. Similarly, adding capacitors at motor terminals or current-limiting resistors at transistor gates proved ineffective or even detrimental. The breakthrough came with the use of an oscilloscope, revealing that the Arduino’s default PWM frequency of 500 hertz was far too low to efficiently drive the motors, generating excessive electrical noise. Increasing the PWM frequency in the code to 2 kilohertz, though still problematic, was a step in the right direction, showcasing the necessity of proper signal conditioning and frequency management for motor control.
Mitigating Electromagnetic Interference (EMF)
One of the most insidious challenges was electromagnetic interference (EMF), which significantly affected the sensitive MPU6050 gyro sensor. Motors, especially when switching rapidly, generate strong electromagnetic fields that can corrupt sensor readings, leading to unstable flight or even Arduino resets. The ingenious solution involved fabricating an EMF blocking shield from a thin copper sheet, derived from an old laptop, and grounding it. Copper acts as a Faraday cage, deflecting electromagnetic waves and protecting the underlying electronics. Mounting the gyro sensor slightly farther from the motor driver, combined with the copper shielding, proved effective in isolating the sensor from the noise source, demonstrating a profound understanding of signal integrity and shielding principles in a compact electronic system.
Tackling Wobbling and Basic PID Tuning in MultiWii
Even after resolving the resetting and EMF issues, aggressive side-to-side wobbling emerged, indicating a need for refined flight control. This is where PID (Proportional-Integral-Derivative) tuning becomes crucial. Using hot glue sticks as temporary landing gear initially helped to stabilize the drone for testing on a flat surface. The video then introduces the basics of PID tuning within the MultiWii firmware, a common platform for Arduino-based flight controllers. By gradually lowering the ‘P’ (Proportional) values for roll and pitch, oscillations can be dampened, as the P-term primarily controls the immediate response to error. Adjusting the ‘Rate’ and ‘Expo’ values further refines the drone’s sensitivity and responsiveness to joystick inputs, allowing for a smoother, more predictable flight experience. This iterative process of adjustment and flight testing is fundamental to achieving optimal stability and control for any FPV drone.
First Flight and Beyond: Calibration and FPV Experience
The culmination of weeks of meticulous building, wiring, and rigorous troubleshooting arrives with the maiden flight of your Arduino FPV drone. This phase brings together all the components and configurations into a functional, airborne unit. Proper calibration and initial FPV setup are essential to ensure a stable and engaging flight experience, transforming the static hardware into a dynamic aerial platform ready for exploration.
Before lift-off, final assembly steps include securing the battery connector, soldering the power wire with correct polarity, and using a rubber band as a lightweight and adjustable battery holder. The drone’s 31mm four-bladed propellers must be mounted with precise attention to their orientation, ensuring they push air downward to generate thrust. Powering on the drone while it rests on a flat surface, followed by the transmitter, then calibrating the gyro with specific joystick movements, prepares the system. After a brief wait, flipping the arm switch unlocks the motors, making the drone ready for flight. This sequence establishes critical communication and initializes the flight controller for stable operation.
The integration of the 3-gram, 600 TVL FPV camera, feeding directly from the LiPo battery, provides the thrilling first-person perspective. Paired with 5.8-gigahertz FPV goggles, the drone’s live video feed immerses the pilot directly into the flight. For indoor bedroom tests or agile outdoor flights in more ‘jungle-like’ locations, the FPV experience is transformative. However, achieving truly smooth flight requires fine-tuning. Connecting the drone to a PC and using software like MultiWii for basic PID tuning allows for critical adjustments. Gradually lowering the ‘P’ column values for roll and pitch helps eliminate unwanted oscillations, while reducing ‘Rate’ and increasing ‘Expo’ smooths out joystick inputs, leading to a much more stable and flyable micro-quadcopter. This final optimization step ensures that the hard work of building and troubleshooting culminates in a truly enjoyable and responsive FPV flying experience, making your custom Arduino FPV drone a joy to pilot.
Your Micro-Flight Mission Debrief: Q&A
What is a micro Arduino FPV drone?
It’s a small drone you build yourself using an open-source Arduino microcontroller, designed to provide a first-person view (FPV) flight experience. This DIY approach makes advanced drone technology more accessible for makers and enthusiasts.
Why would someone choose to build a drone with Arduino instead of buying one?
Building with Arduino offers great flexibility, lower cost, and a deep learning experience about electronics and flight dynamics. It gives you complete control over the drone’s firmware and allows for extensive customization.
What are some of the key components needed to build this tiny drone?
You’ll need small brushed coreless motors, an Arduino Pro Mini acting as the flight controller paired with an MPU6050 sensor, an NRF24L01 radio module for control, an FPV camera, a LiPo battery, and a custom frame.
What are the options for building the drone’s frame?
The frame can be built using simple, low-cost materials like popsicle sticks, which requires precision crafting. Alternatively, for greater precision and design freedom, you can use a 3D printer and PLA filament.
What is PID tuning and why is it important for the drone’s flight?
PID tuning is the process of adjusting software settings within the flight controller to optimize the drone’s stability and responsiveness. It helps eliminate wobbling and makes the drone fly more smoothly and predictably.