The accompanying video provides a compelling visual guide demonstrating the process for constructing a quadcopter at home, inspiring many enthusiasts to embark on this rewarding DIY journey. Constructing your own drone offers unparalleled opportunities for customization and deeper understanding of these complex flying machines. This written companion aims to elaborate on the intricate details and considerations involved in making a drone, complementing the practical demonstrations shown.
Engaging in a DIY drone project offers numerous benefits beyond merely acquiring an aerial vehicle. Significant cost savings are frequently realized, particularly when selecting components judiciously rather than purchasing a pre-assembled commercial drone. Furthermore, the invaluable knowledge gained about electronics, aerodynamics, and programming during the assembly process is substantial, fostering a deeper appreciation for the technology.
Understanding Core Components for Building Your Own Quadcopter
Every successful drone build begins with the careful selection of appropriate components, each fulfilling a critical role in the quadcopter’s operation. While the video effectively showcases the physical assembly, a comprehensive understanding of each part’s function is paramount. Specific considerations must be made regarding power, control, and structural integrity for optimal performance.
The Quadcopter Frame: Structural Integrity
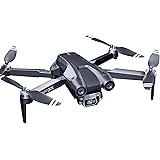
The frame serves as the skeletal structure for the entire quadcopter, supporting all other components securely. Frames are typically chosen based on their size, material, and intended flight purpose, with common materials including carbon fiber for its strength-to-weight ratio. Different frame sizes, often denoted by their motor-to-motor diagonal distance in millimeters, dictate the propeller size and overall thrust capabilities. For instance, a 250mm frame is often preferred for agile FPV racing drones, whereas larger 450mm frames are better suited for stable aerial photography platforms. Frame selection consequently influences the drone’s maneuverability and payload capacity.
Motors and Electronic Speed Controllers (ESCs)
Brushless DC motors are universally preferred for quadcopters due to their efficiency and power output, differing significantly from brushed motors in performance. These motors are rated in Kv (kilovolts per minute), indicating their RPMs per volt, which helps determine appropriate propeller and battery pairings. Each motor requires an Electronic Speed Controller (ESC) to regulate its power, translating signals from the flight controller into precise motor rotations. ESCs are crucial for managing current flow and preventing motor damage, with their amperage rating needing to match or exceed the motor’s maximum current draw. Many modern ESCs support advanced protocols like DSHOT, ensuring faster and more accurate communication with the flight controller.
The Flight Controller: The Drone’s Brain
Serving as the central processing unit, the flight controller interprets pilot commands and stabilizes the drone by continuously adjusting motor speeds. This vital component contains various sensors, including gyroscopes and accelerometers, to monitor the drone’s orientation and movement in real-time. Popular flight controllers, such as those running Betaflight or ArduPilot firmware, offer extensive configuration options and feature sets. The chosen flight controller’s compatibility with other components, especially the receiver and ESCs, is a critical consideration for seamless integration. Its processing power greatly impacts the drone’s responsiveness and stability algorithms.
Battery and Power Distribution Board (PDB)
Lithium Polymer (LiPo) batteries are the standard power source for hobby drones, celebrated for their high energy density and discharge rates. Battery selection involves balancing voltage (cells, e.g., 3S, 4S), capacity (mAh), and C-rating, which dictates maximum safe discharge current. A Power Distribution Board (PDB) efficiently routes power from the battery to all the ESCs and the flight controller, often integrating voltage regulators for cleaner power delivery. Some advanced flight controllers now incorporate PDB functionality directly, simplifying the wiring process considerably. Proper battery management and charging protocols are paramount for safety and longevity.
Propellers: Generating Lift
Propellers are perhaps the simplest yet most crucial components, directly responsible for generating the lift required for flight. Their specifications include length and pitch (e.g., 5040, meaning 5 inches long with a 4-inch pitch), influencing thrust and efficiency characteristics. Selecting the correct propeller size and pitch is directly related to the motor’s Kv rating and the quadcopter’s intended use. A higher pitch generally means more thrust but also draws more current, impacting flight duration. Propeller efficiency is a major factor in determining flight time.
Receiver and Transmitter: Pilot Control Link
A radio transmitter, held by the pilot, sends control signals wirelessly to a receiver mounted on the quadcopter. This communication link enables the pilot to control the drone’s movements and functions during flight. Various radio protocols exist, such as FrSky’s ACCST/ACCESS or Crossfire/ELRS, each offering different ranges, latency, and features. The chosen receiver must be compatible with the transmitter, ensuring a reliable and responsive control interface. Reliable signal transmission is absolutely essential for safe and enjoyable drone operation.
Assembling Your DIY Drone: A Step-by-Step Approach
Following the visual instructions provided in the video, a systematic approach to assembly ensures a robust and functional quadcopter. Each step builds upon the previous one, necessitating careful attention to detail and correct component orientation. Proper soldering techniques are often critical for secure electrical connections throughout the build.
Frame Assembly and Motor Mounting
The frame components are typically screwed together according to the manufacturer’s instructions, forming the basic structure of the drone. Motors are subsequently mounted onto the frame’s arms, ensuring their rotation direction aligns with the quadcopter’s flight control scheme. While a clean build is visually appealing, careful consideration for component placement also aids in future maintenance. The rotational direction of each motor is crucial for generating the correct thrust vectors for flight.
Integrating ESCs and Flight Controller Wiring
Each ESC is then connected to its respective motor, often requiring precise soldering for robust electrical contact. The ESCs are then wired to the Power Distribution Board (PDB) for power and to the flight controller for signal input. Modern flight controllers often simplify wiring with dedicated ports for ESCs, sometimes using a single multi-pin connector for multiple ESCs. The flight controller is mounted securely in the center of the frame, typically using standoffs to prevent vibrations from affecting its sensors. Correct wiring of signal and ground wires is paramount to avoid short circuits and ensure proper communication.
Connecting the Receiver and Final Wiring
The radio receiver is connected to the flight controller using appropriate protocols like SBUS, IBUS, or Crossfire/ELRS, which typically require only a few wires. All final wiring, including power cables from the PDB to the flight controller, must be carefully managed to avoid interference and ensure a clean aesthetic. Zip ties or electrical tape are often used to secure loose wires, preventing them from interfering with propellers or other moving parts. Attention to detail at this stage prevents frustrating debugging later.
Initial Setup and Calibration for Optimal Flight
Hardware assembly represents only half the journey; the drone must then be configured and calibrated through its flight controller software. This critical phase involves flashing firmware, calibrating sensors, and testing motor functionality. These steps ensure the drone responds correctly to pilot commands and maintains stable flight characteristics. A carefully calibrated drone provides a much more enjoyable and safer flying experience.
Firmware Flashing and Basic Configuration
The flight controller requires specific firmware, such as Betaflight, to be flashed onto its microchip, providing the operating system for the drone. Configuration software, often a configurator application running on a computer, is then used to set up basic parameters like motor layout, ESC protocols, and receiver type. This initial setup establishes the fundamental operational parameters of the quadcopter. Correct firmware for your specific flight controller hardware is essential for proper functionality.
Radio and Sensor Calibration
The radio transmitter must be calibrated within the flight controller software to ensure that stick movements accurately translate into control signals. This involves moving all sticks through their full range to set minimum and maximum values. Furthermore, the flight controller’s built-in sensors, including the accelerometer and gyroscope, require calibration to establish a baseline for stable flight. This calibration process compensates for any minor offsets in the sensors. Proper sensor calibration is critical for the drone’s ability to self-level and maintain orientation accurately.
Motor Direction Testing and Fail-Safe Setup
Before any propellers are attached, the motors must be individually tested within the configurator to confirm correct spin direction and functionality. This test prevents potential accidents during the first flight by verifying all components are working as expected. Finally, a fail-safe mechanism must be configured, dictating the drone’s behavior if it loses signal from the transmitter. A common fail-safe action involves cutting motor power, allowing the drone to land safely. Implementing a robust fail-safe system is a crucial safety measure for any DIY drone.
Safety Considerations for Drone Building and Operation
Safety must always be the paramount concern throughout the entire drone building and flying process. LiPo batteries, for example, possess high energy density and can pose a fire hazard if mishandled or damaged. Proper soldering techniques prevent electrical shorts, which could cause component failure or even fire. Always use appropriate safety gear, such as safety glasses, during assembly and soldering operations. Understanding and adhering to local aviation regulations for drone operation is also essential for responsible flying. Operating drones near airports or in restricted airspace is strictly prohibited. Furthermore, always ensure that your flight area is clear of people and obstacles before taking off, minimizing potential risks during flight.
Expanding Your Drone Knowledge and Customization Options
The journey of building a quadcopter at home does not end with its successful first flight; rather, it marks the beginning of countless opportunities for further learning and customization. Experimenting with different propeller sizes or motor configurations can significantly alter flight characteristics and performance. Upgrading components like the flight controller or adding advanced features such as GPS or FPV (First-Person View) cameras can expand the drone’s capabilities considerably. Many enthusiasts find joy in fine-tuning their drone’s flight parameters, unlocking new levels of control and agility. Continuously engaging with the DIY drone community provides a wealth of shared knowledge and innovative ideas for future projects.